SSH Keys Microsoft Windows
8 minute read
SSH Keys on MS Windows
What are SSH keys?
SSH (Secure Shell) keys are an access credential that is used in the SSH protocol.
The private key remains on the system being used to access the HPCC cluster and is used to decrypt information that is exchanged in the transfer between the HPCC cluster and your system.
A public key file is used to encrypt information, and is stored on your own system. The public key file is stored on the HPCC cluster and contains a list of authorized public keys.
Why do you need SSH keys?
HPCC supports two authentication methods; Password+DUO and SSH Keys.
The Password+DUO method requires a UCR NetID, if you do not have this then you will need to use SSH keys in order to access the HPCC cluster.
What you need
MobaXterm
You will need to install MobaXterm in order to generate your SSH keys and also to transfer the keys to the cluster.
- Download
MobaXtermfromhere. - Unzip
- Double click portable version of exe and run the
MobaXtermapplication.
Persistent Home Directory
By default, MobaXterm will not have a presistent home directory, meaning any files saved there will be lost the next time you start it. To use a persistent home directory, go to “Setting > General > Persistent Home Directory”. If this shows “< Temp Directory >”, then change it to where you would like your home directory to be stored on your computer.
Finding Files on Windows
To find where a file is located on windows from within a MobaXterm terminal, you can use the open command. For example open . to open the directory you are currently in, or open ~ to open your home directory.
FileZilla
If you choose to upload you SSH key to the HPCC cluster with a GUI app, you will need to install FileZilla or a similar sFTP/SCP client.
Note, FileZilla is not required if you use the command-line approach below.
- Download the
FileZilla Clientfor Windows here. * Make sure your Windows system is updated to the latest version. - Follow the install wizard to complete the install of
Filezilla.
Create SSH Keys (MobaXterm)
The following provides instructions for both (A) command-line-based and (B) GUI-based SSH key creation. Users need to choose which option is more suitable for them. Usually, the command-line based approach is much quicker even for users without command-line experience since it only requires to copy and paste a few lines of code.
(A) Command-line-based SSH key creation
Creating SSH keys in MobaXterm from the command-line is straightforward and almost identical to creating SSH keys under macOS and Linux (see here). To create the SSH key pair from the command-line, open the MobaXterm terminal and then execute the following commands. This can be done by a simple copy and paste rather than typing, and then pressing the enter key. Users who wish to use WinSCP instead of FileZilla as sFTP client need to follow the key generation instructions of this software as outlined here.
mkdir -p ~/.ssh # creates SSH directory
ssh-keygen -t rsa -f ~/.ssh/id_rsa # creates key pair (private and public)
Next, check the content of the newly created .ssh directory with ls -al .ssh/. It should contain files for the private and public keys that are named
id_rsa and id_rsa.pub, respectively. Importantly, this private key file should not be shared.
Note, when using PuTTY (and WinSCP) instead of MobaXterm for generating SSH
keys, then the private key is stored in PuTTY’s proprietary key format, which is
indicated by a .ppk file extension. A key of this format is required when using
PuTTY as SSH client, and it cannot be used with other SSH client tools.
The public key is the one that needs to be uploaded to the remote system one
wishes to connect to. On the HPCC cluster it needs to be saved in a file
located under this location of your home directory: ~/.ssh/authorized_keys.
The upload can be performed with an sFTP/SCP GUI app like the one built into
MobaXterm or FileZilla (see GUI section below). Copying the key from MobaXterm
into the clipboard (e.g. in less) and then pasting it into the
corresponding file opened on the remote system with a code editor like vim is
another but more advanced option. The following shows how to upload the private
SSH key from the command-line in MobaXterm to the HPCC cluster using the scp
command, where it is important that users replace <username> with their own
username on the HPCC cluster. Importantly, only one of the following two
commands should be used. The first one should be used if an authorized_keys
file does not exist yet, e.g. when a user configures SSH key accees on the
HPCC system for the first time. The second one should be used to append a new
public SSH key to an already existing authorized_keys file.
Create new
authorized_keysfilescp .ssh/id_rsa.pub <username>@cluster.hpcc.ucr.edu:.ssh/authorized_keysAppend SSH key to already existing
authorized_keysfilescp .ssh/id_rsa.pub <username>@cluster.hpcc.ucr.edu:tmpkey && ssh username@cluster.hpcc.ucr.edu "cat tmpkey >> ~/.ssh/authorized_keys && rm tmpkey"
Note, prior to setting up SSH key access both of the above scp commands
require functional password/DUO credentials. Users who do not have password/DUO
access (e.g. non-UCR users) will need to email their public SSH key to support@hpcc.ucr.edu so that the
systems admin can add their public SSH key to ~/.ssh/authorized_keys of the corresponding
user account.
(B) GUI-based SSH key creation
Please use the following GUI-based instructions for generating SSH keys at your own risk. The above command-line approach is preferred since it is much easier and reliable.
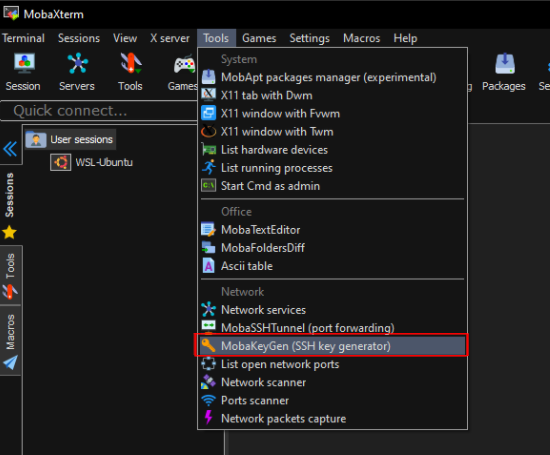
Begin by clicking on the tools drop down on the upper menu bar
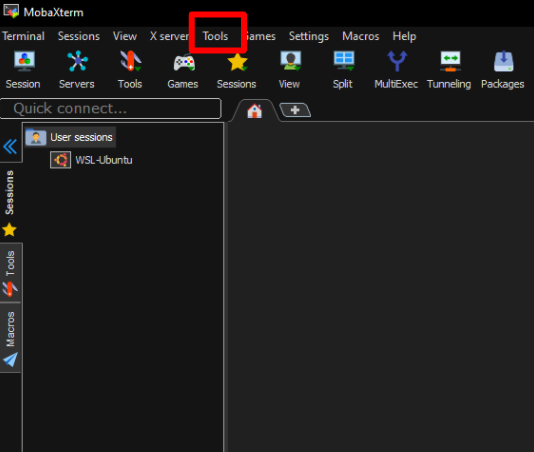
Find and click on the MobaKeyGen (SSH key generator) option
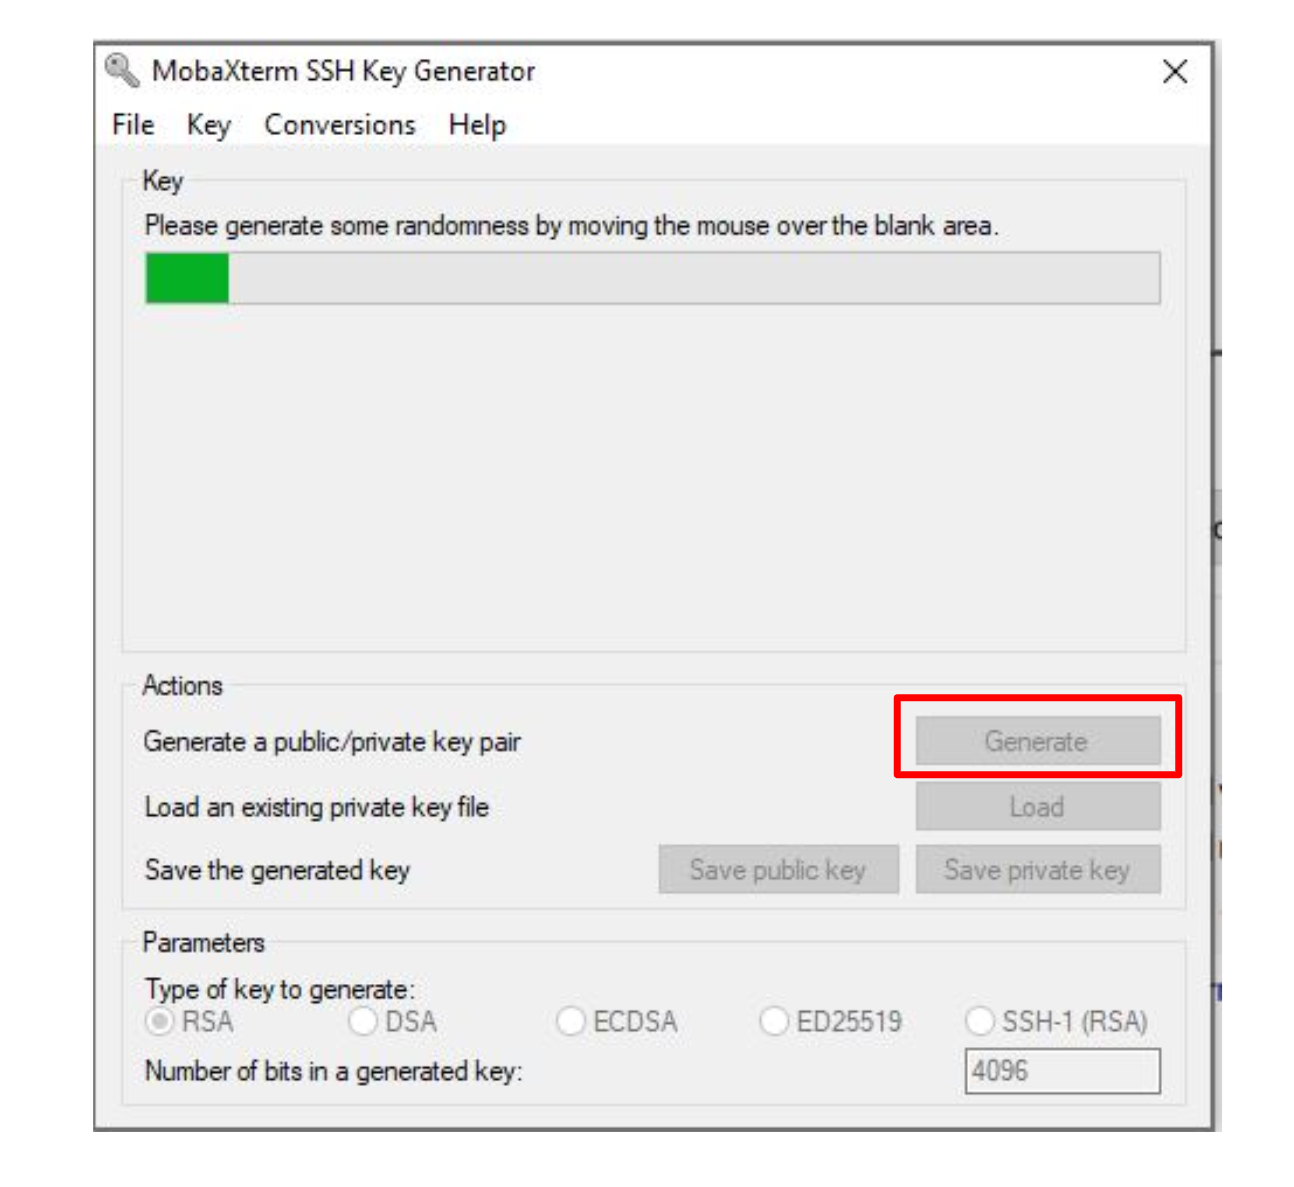
A window should appear to create a new SSH key. Click on generate to create a new SSH key pair. Follow the on menu instructions.
Once your key has been created, enter a password in the key passphrase field to password protect your key. Click on
conversionsin the tool bar and click onExport OpenSSH Key. Save this key asid_rsaand put the file in an easy to access location. Click onSave private keyto save the private key with an extension of.ppkto use with MobaXterm or FileZilla. Save the key asmobaxterm_privkeyand put the file in an easy to access location.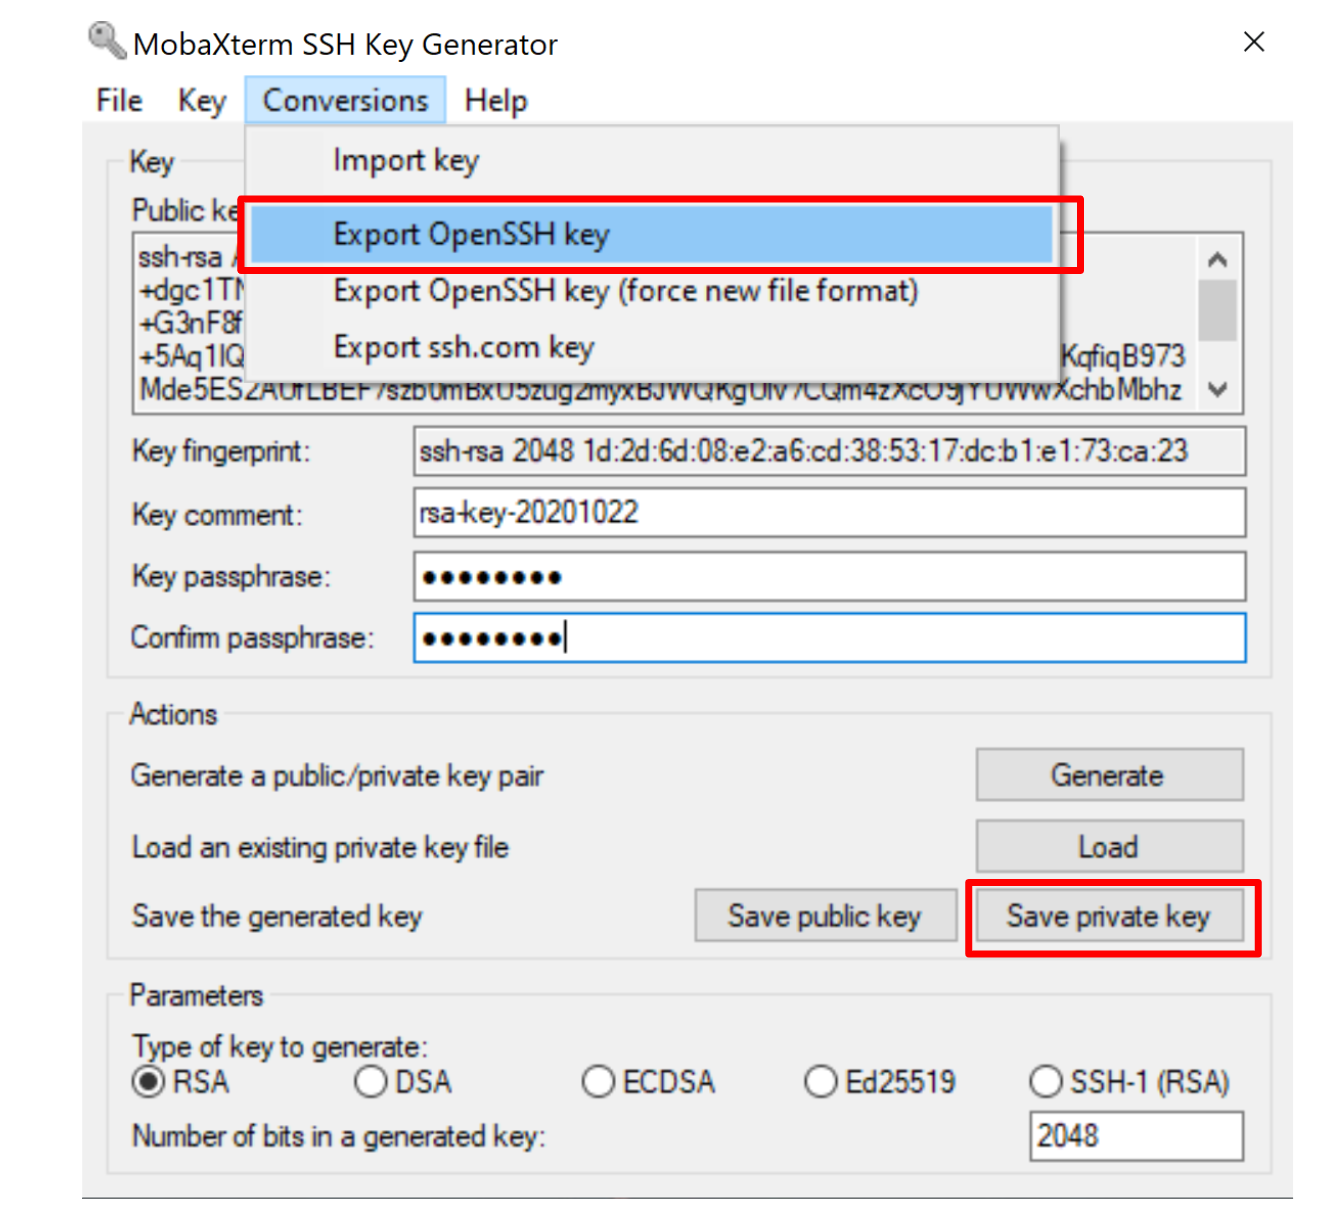
Highlight EVERYTHING in the box labeled “Public key for pasting into OpenSSH authorized_keys file” then right-click on it and choose Copy. Open
Notepadand paste the copied text. Save the file asid_rsa.puband put the file in an easy to access location.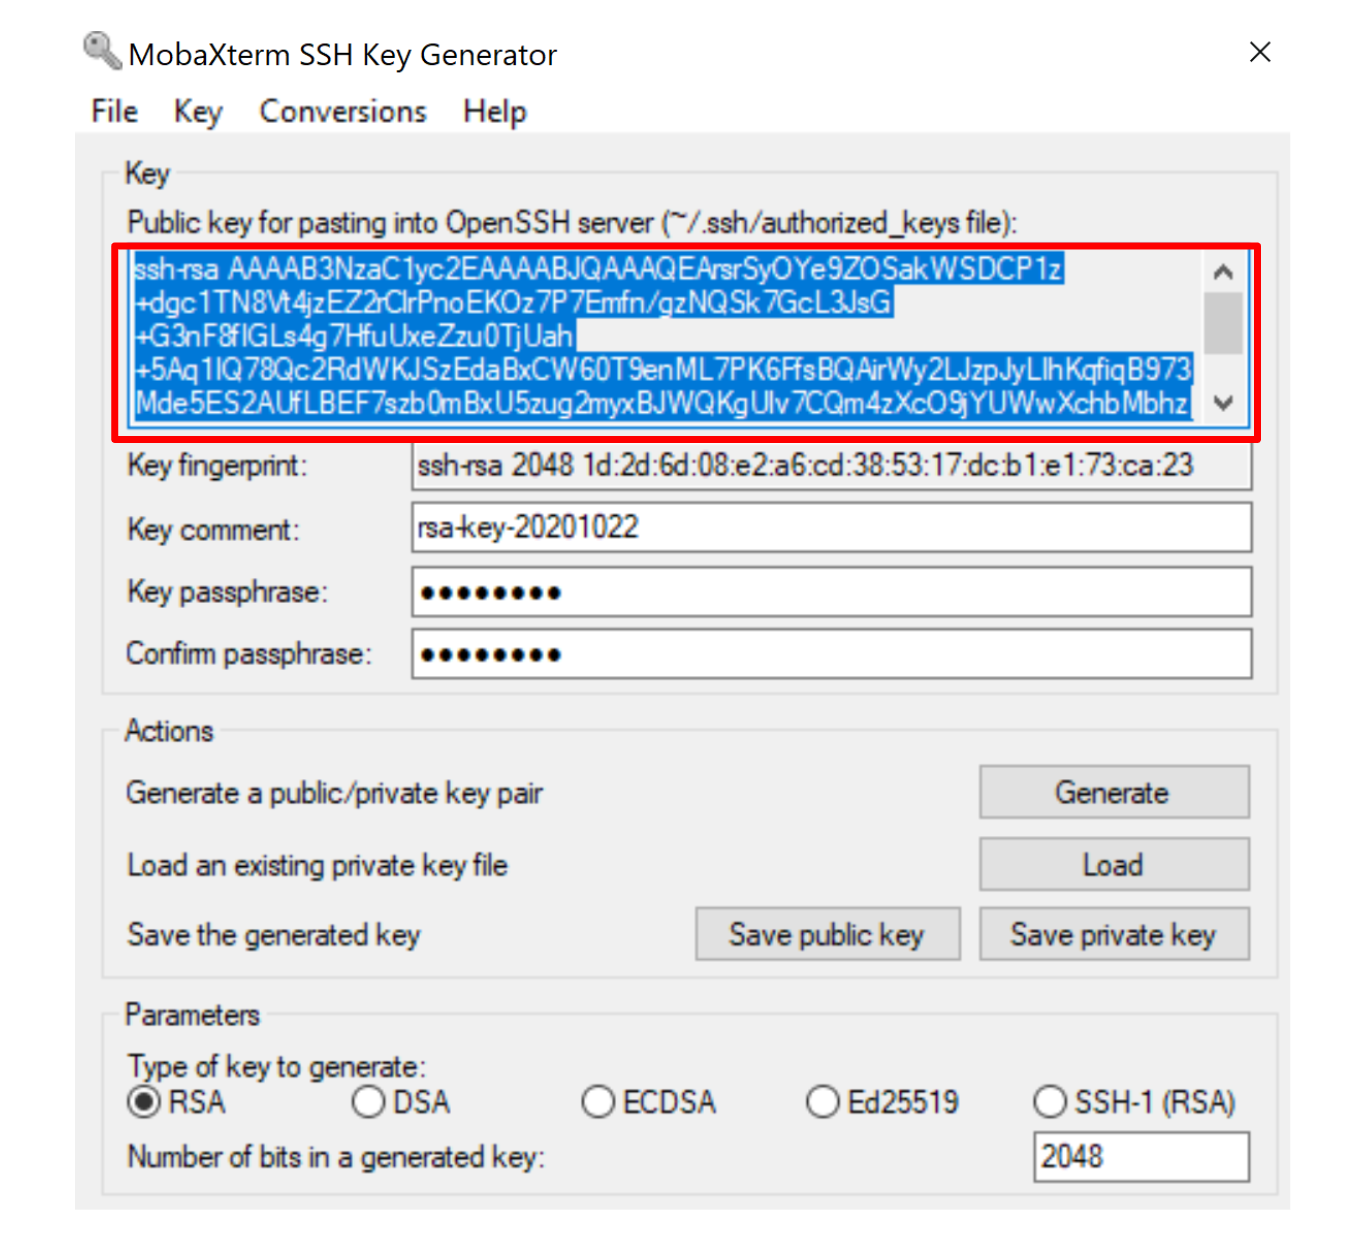
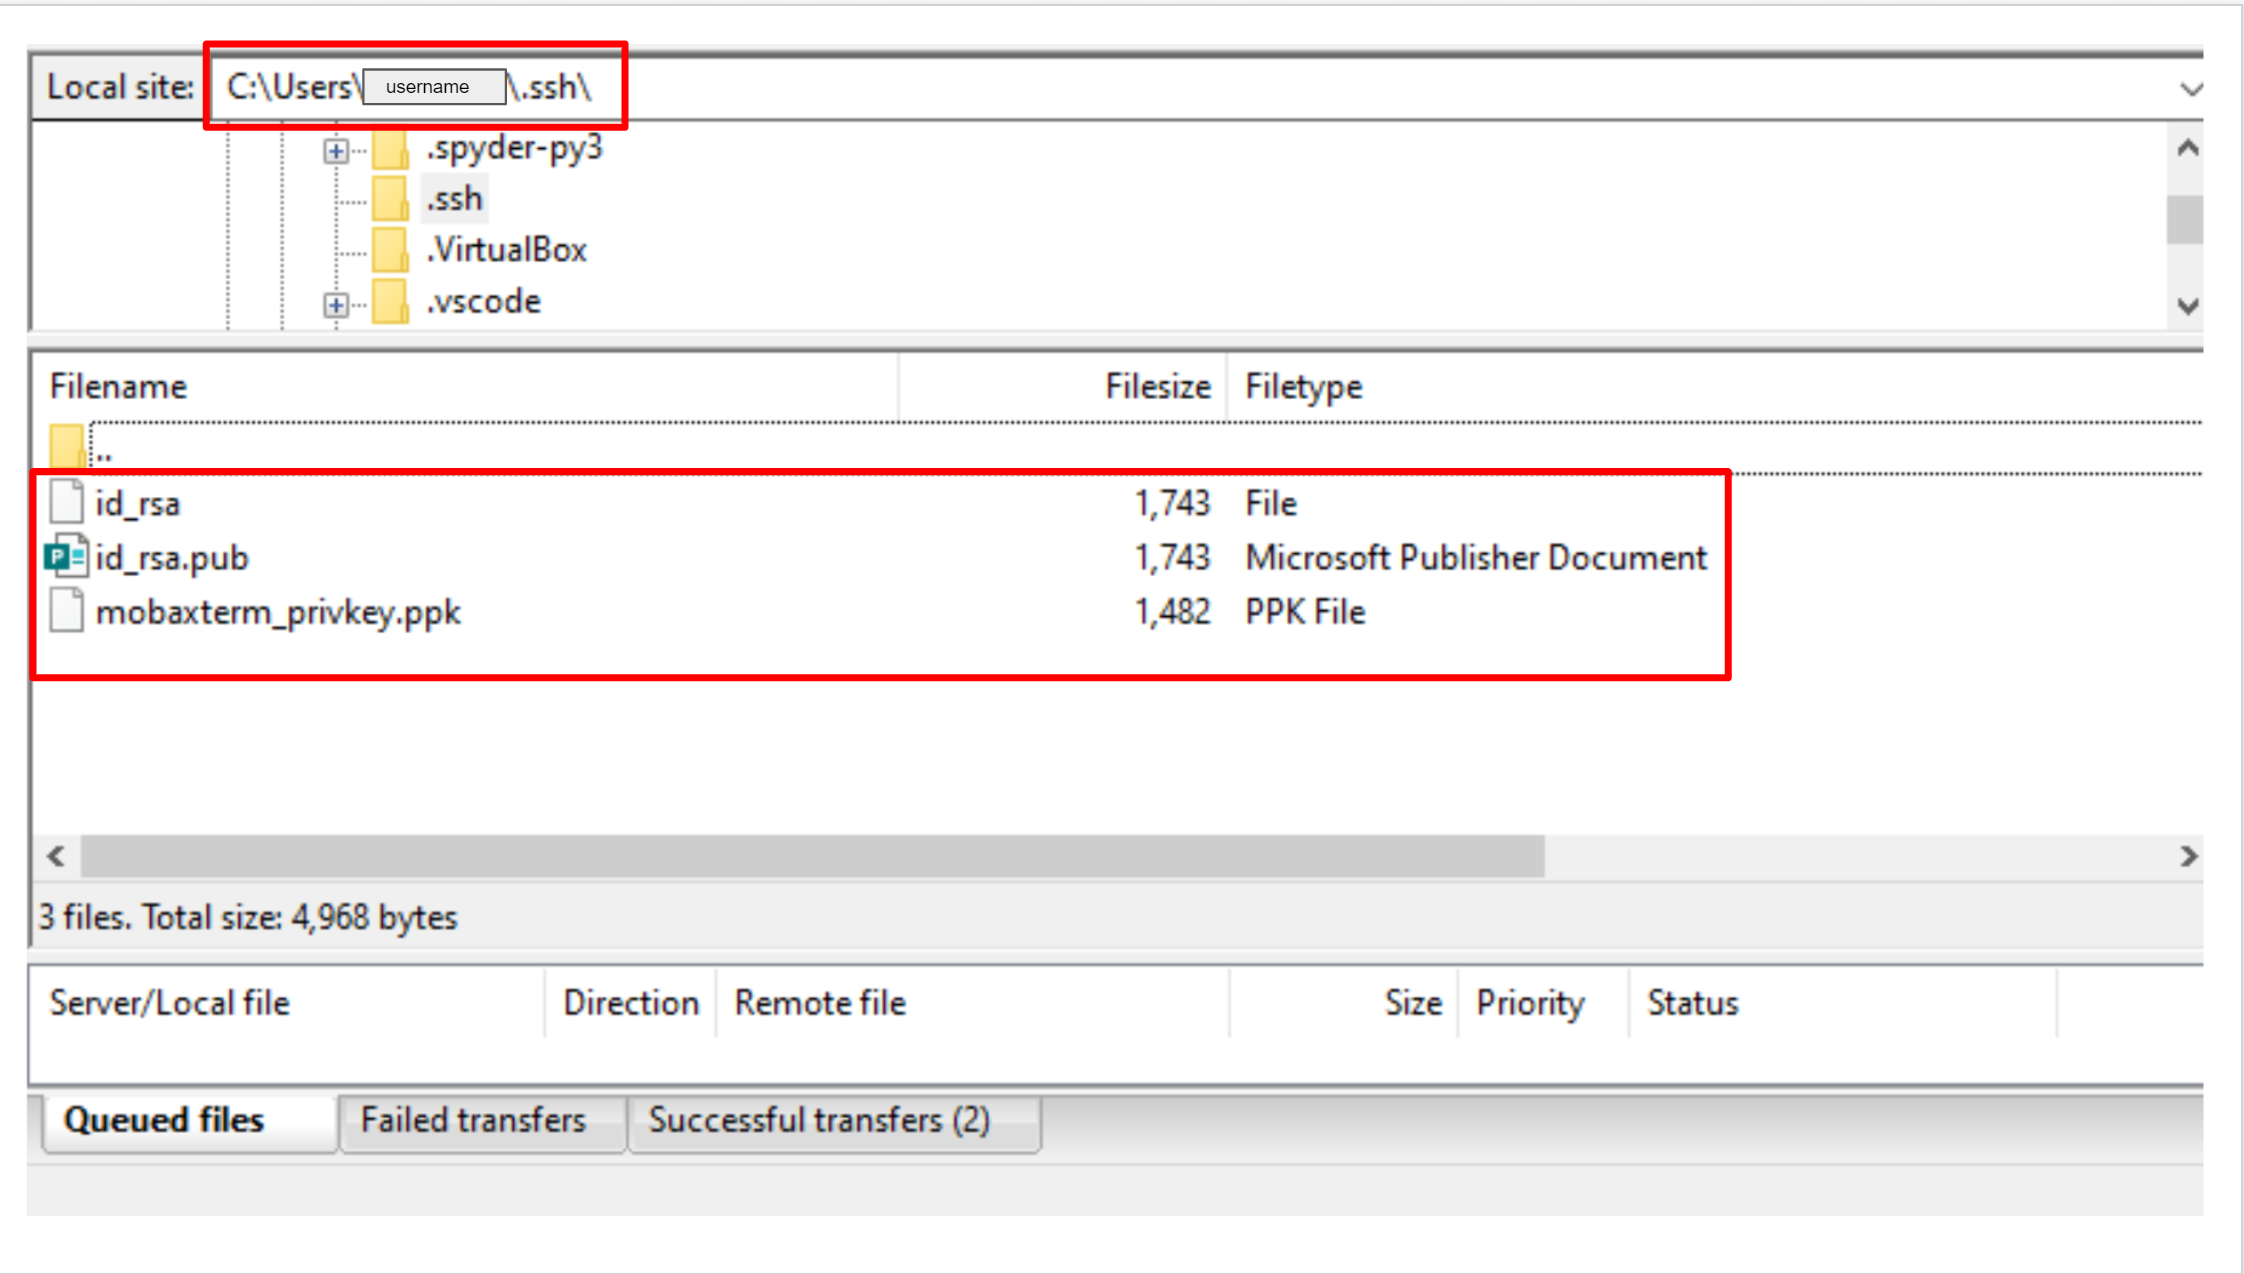
Keys Location
SSH keys should be saved under the location C:\Users\username\.ssh.
Configure SSH Keys
Public SSH Key
Now that you have created your SSH keys, and renamed them, you will need to placed the public key (id_rsa.pub) on the cluster using the cluster.hpcc.ucr.edu
Start the
Filezillaapplication.Open the
Site Managerbutton in the top bar of icons.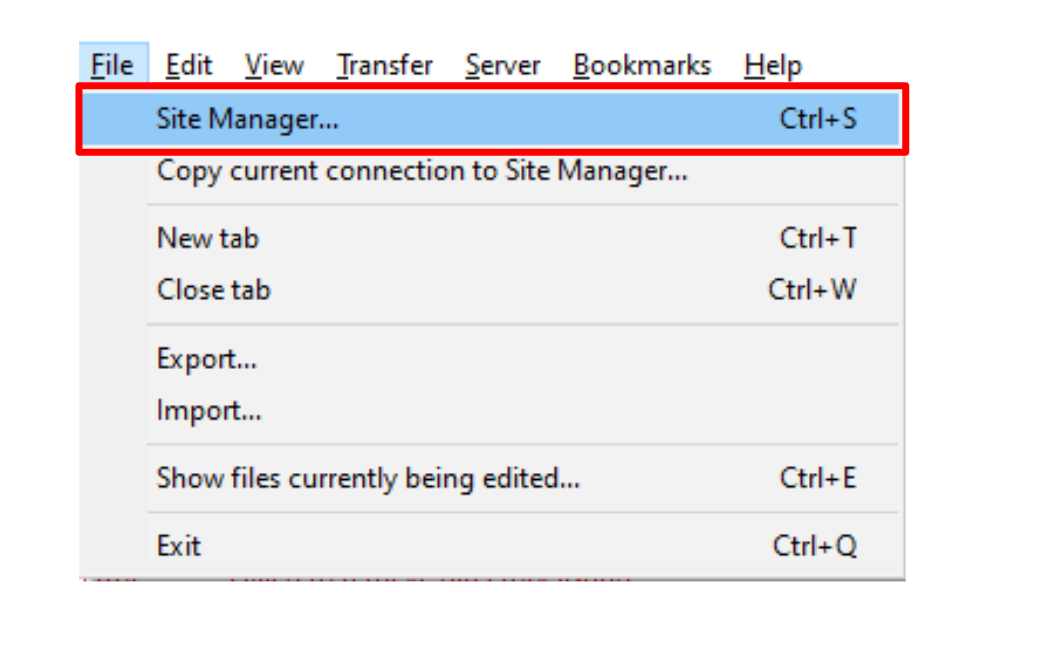
Click on
New Site, rename it (optional) and press enter.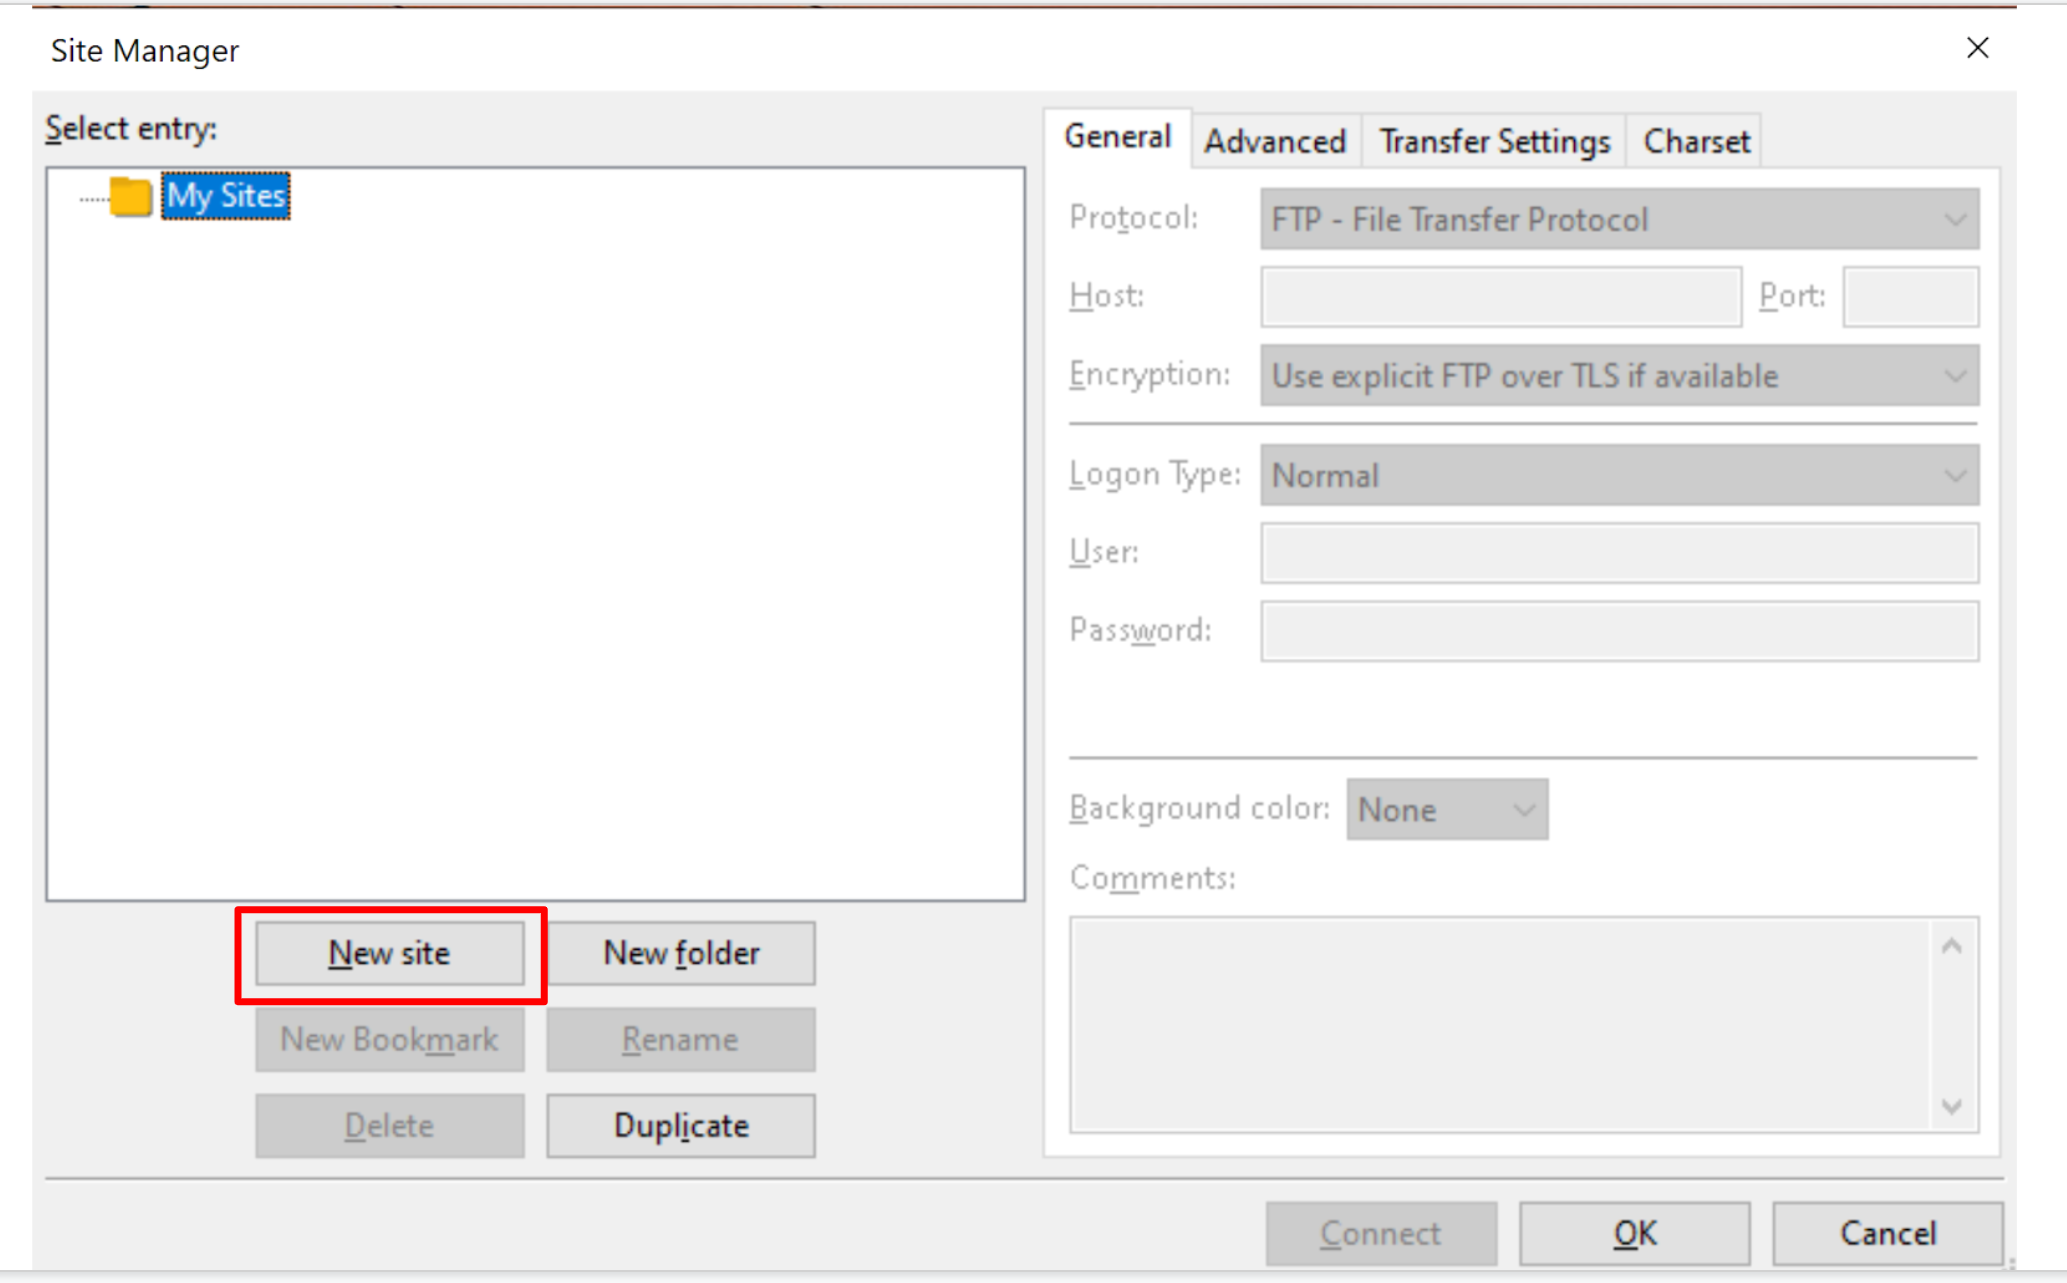
Make sure to use the following settings for the site:
Protocol: should be set toSFTP - SSH File Transfer ProtocolHost: type incluster.hpcc.ucr.eduPort: type22Logon Type: set toInteractiveUser: type in your HPCC username
Click “Connect”. If the next pop up prompts you, then check the box that states
Always trust this host, add this key to the cache, then click theOKbutton.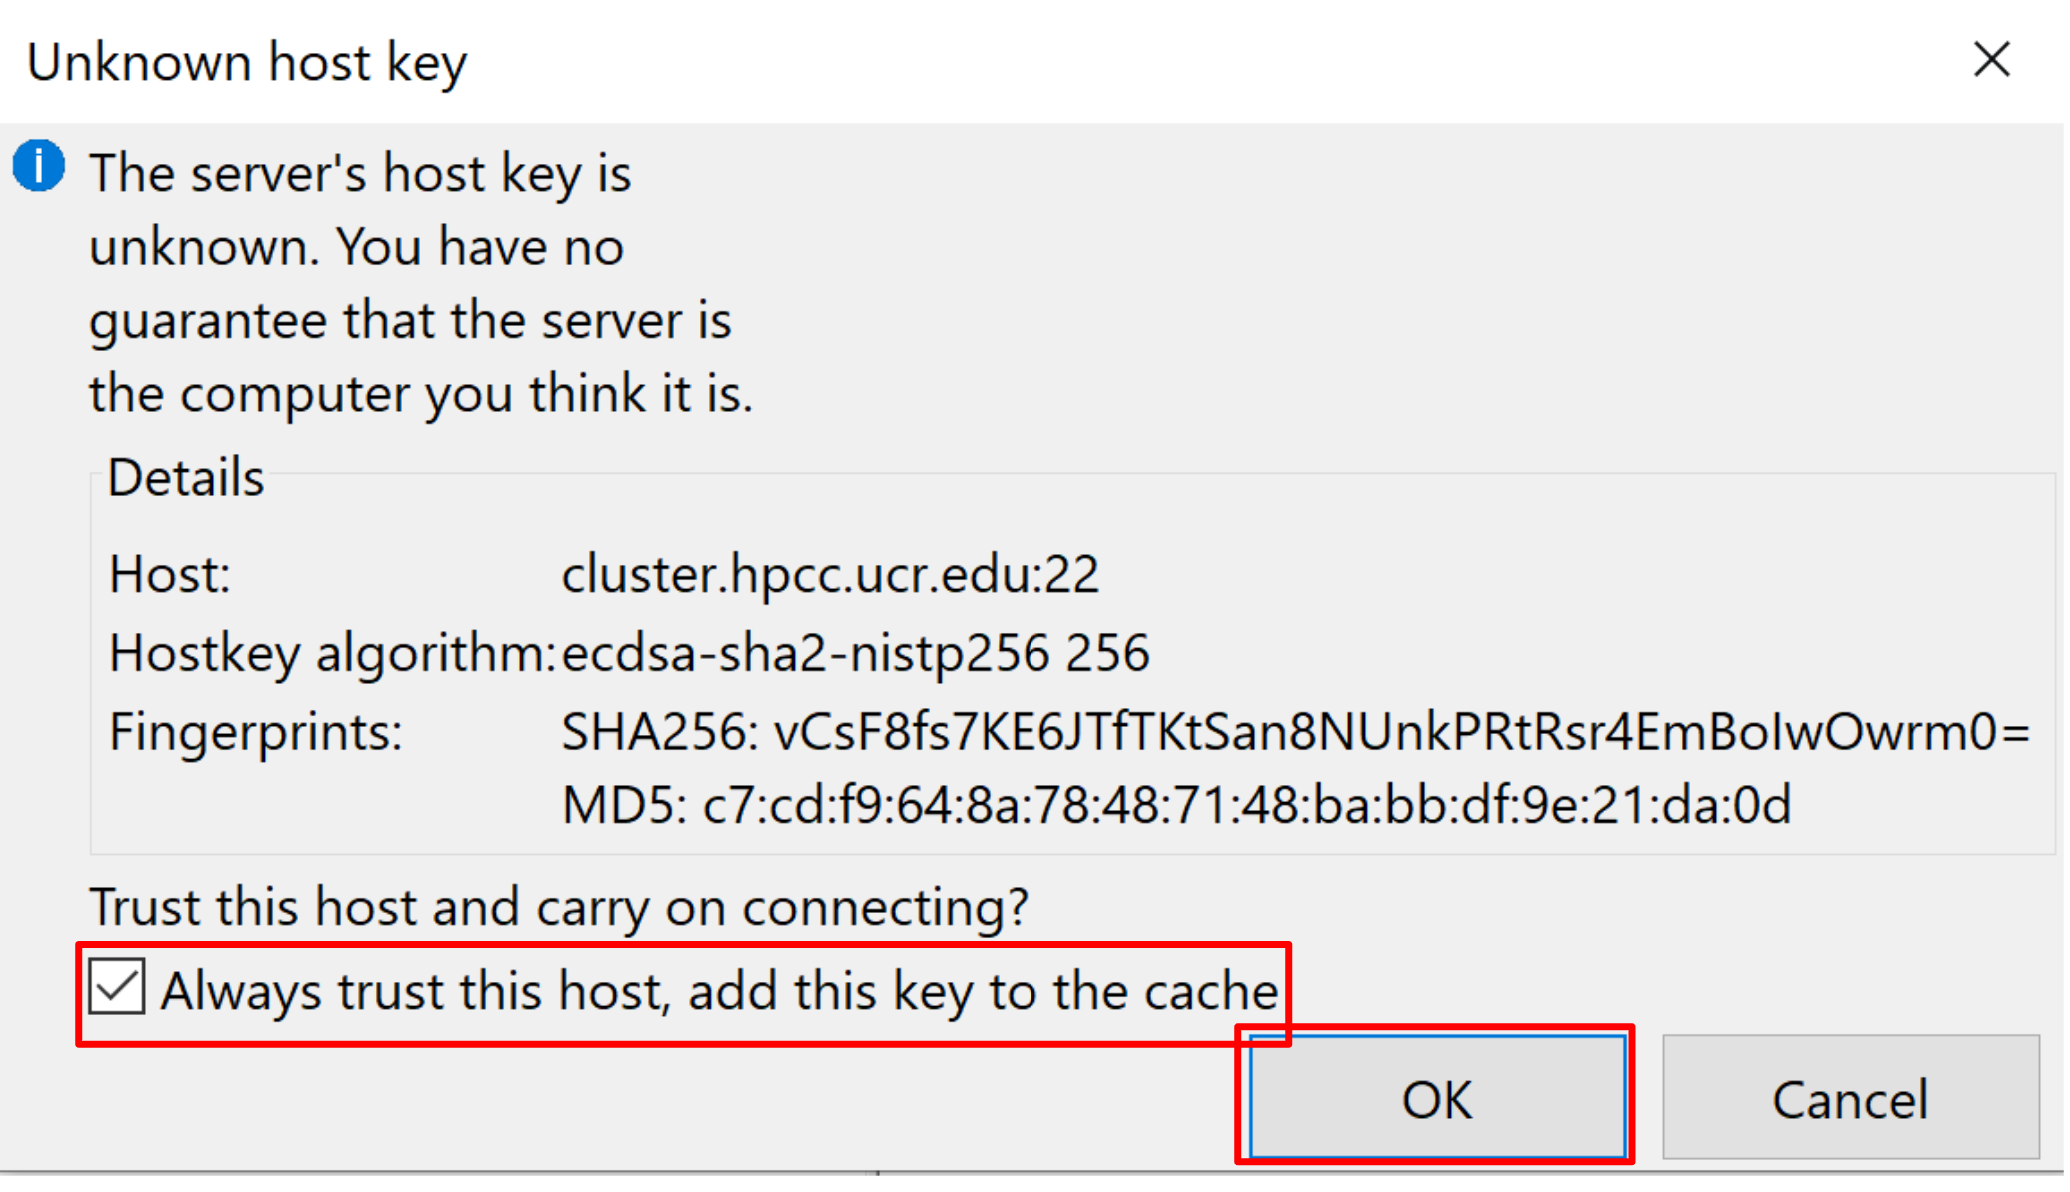
You will need to create a
.sshdirectory, if it doesn’t already exist, to hold your SSH keys. On the right hand side, right click and click on theCreate directory optionunder your home folder location.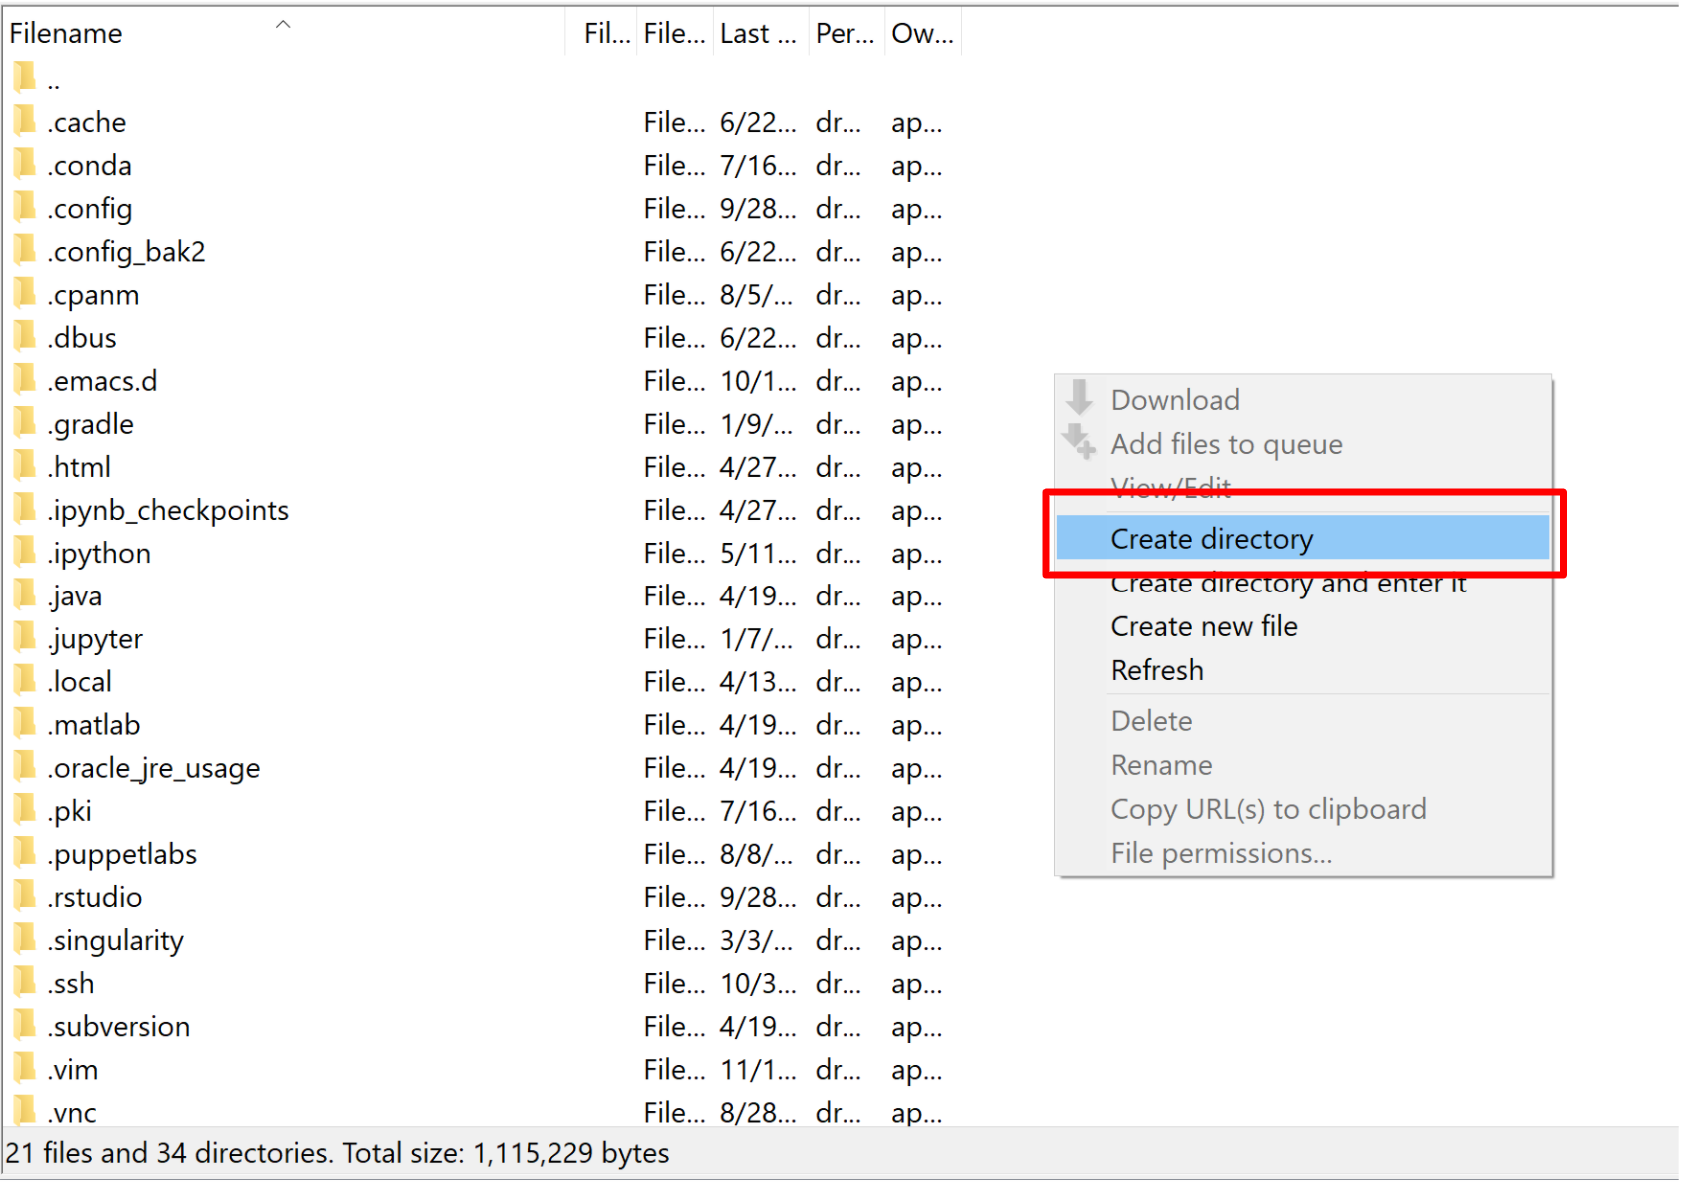
A window will appear to name the new directory. Name should be the following format:
/rhome/username/.ssh. After naming the new directory click onOK.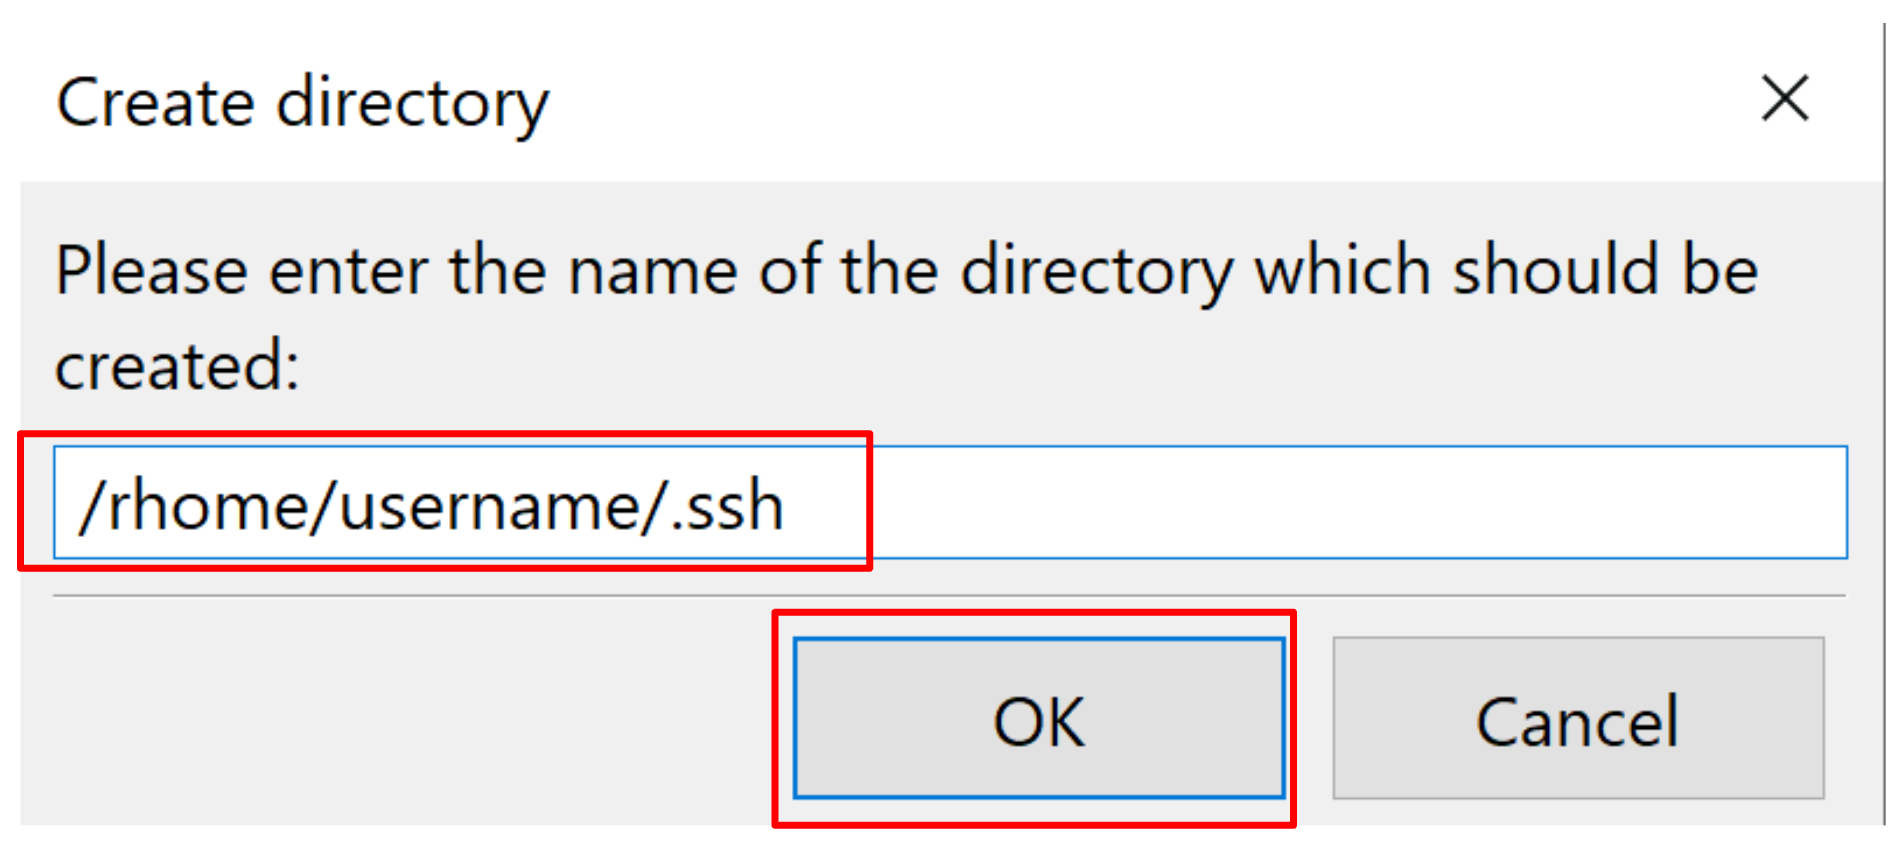
Right click on the new
.sshdirectory that has been created. Find and click onFile permissions.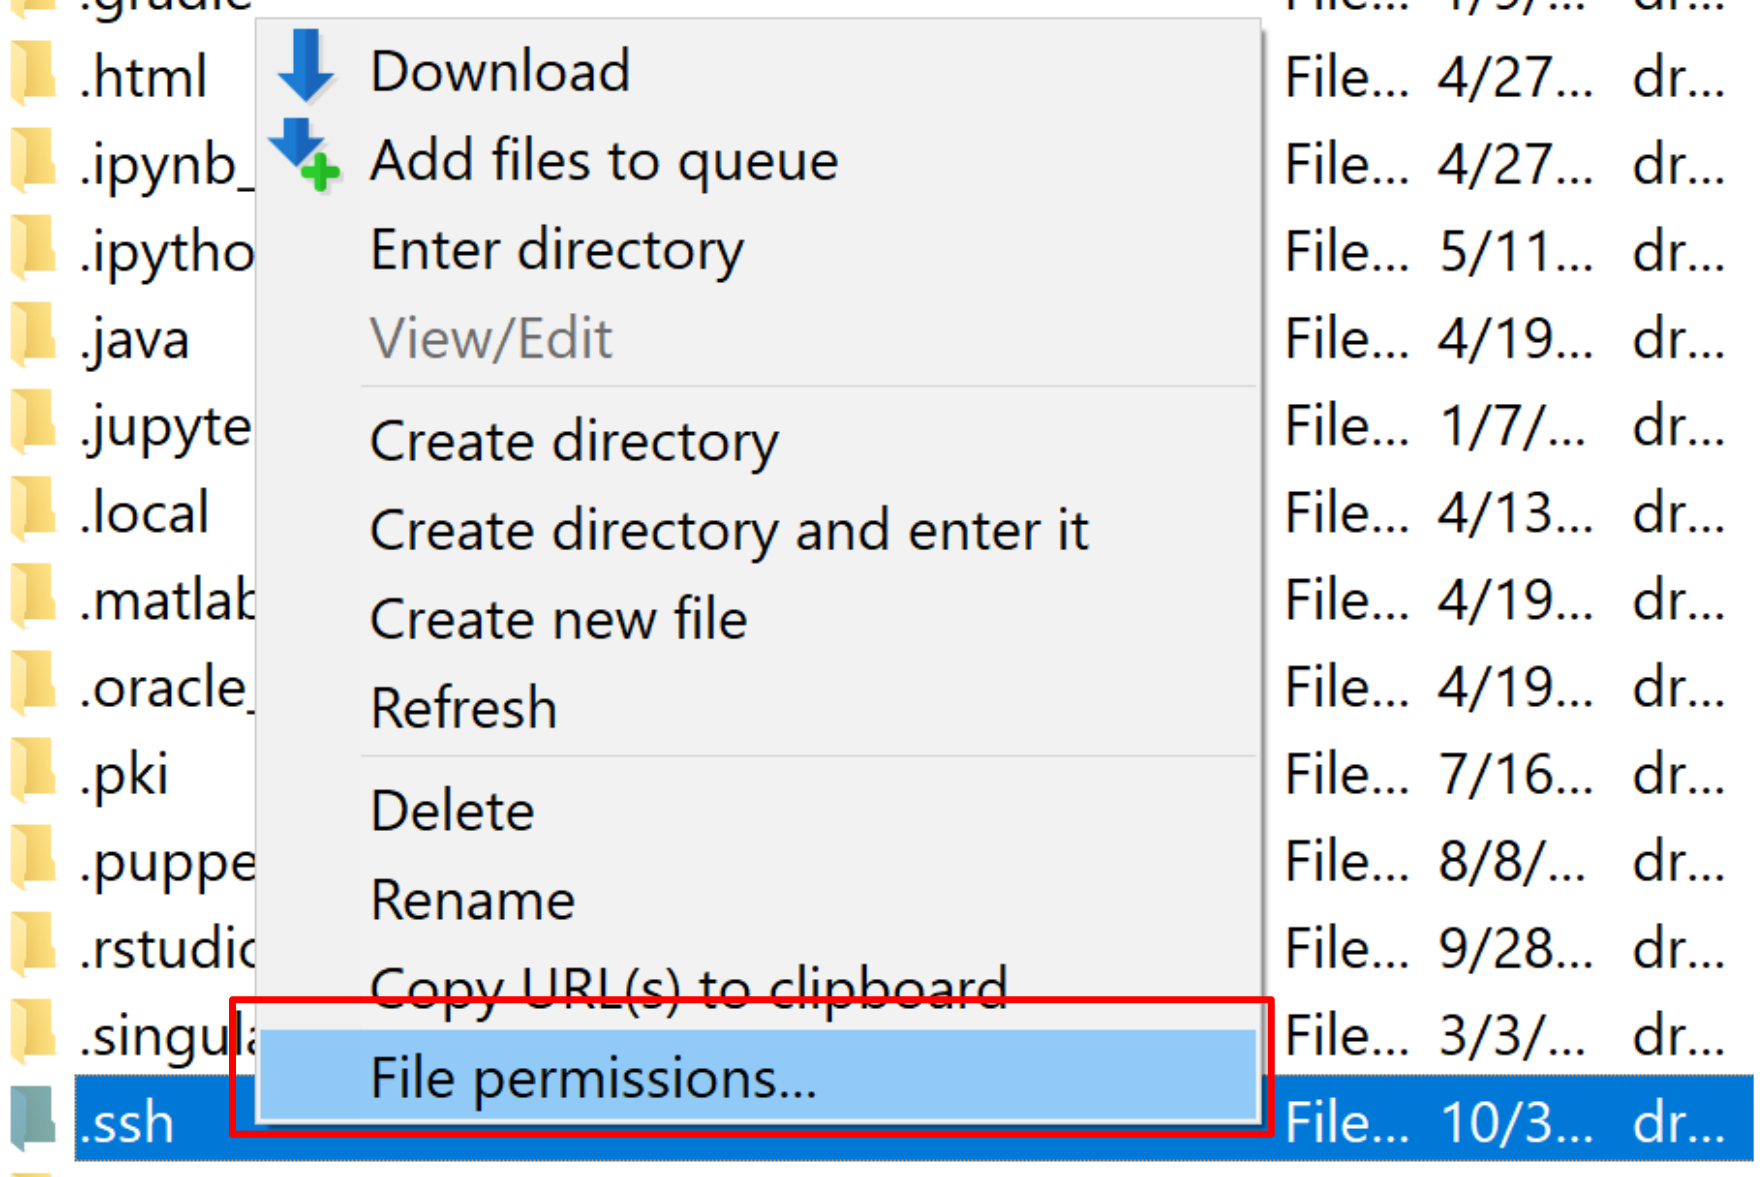
A window with the directory permissions will appear. The
.sshdirectory needs exact permissions in order for it to function properly. Follow the image below to apply the permissions.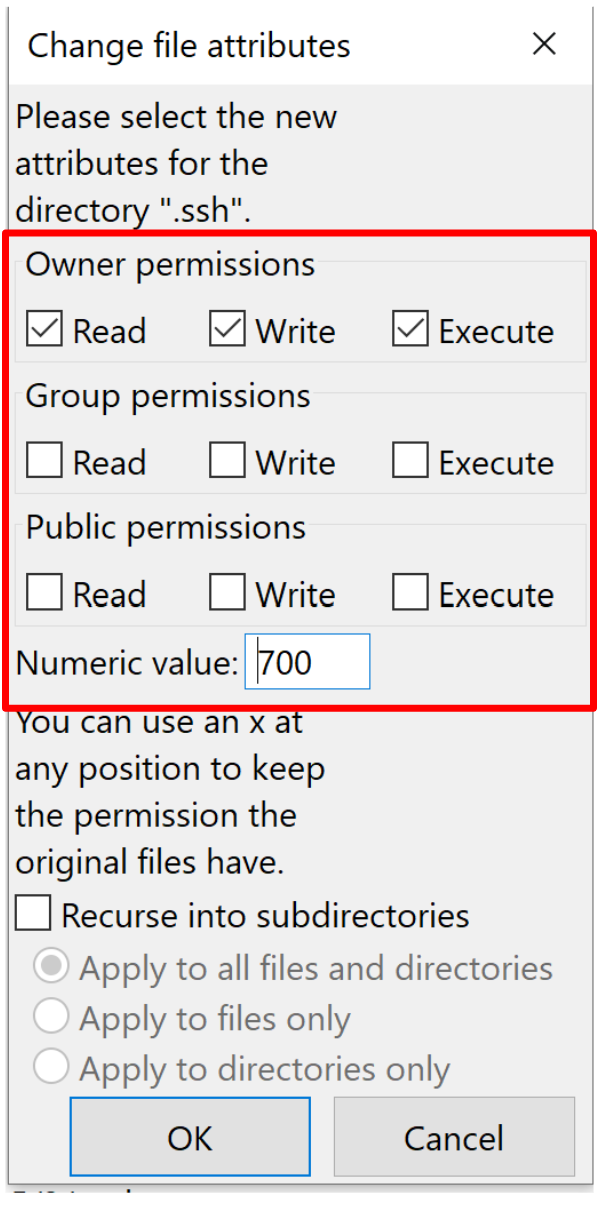
Now that you are connected to Filezilla transfer your public SSH key from your system by dragging the file
id_rsa.puband dropping it into the HPCC cluster direcotry/rhome/username/.ssh/.
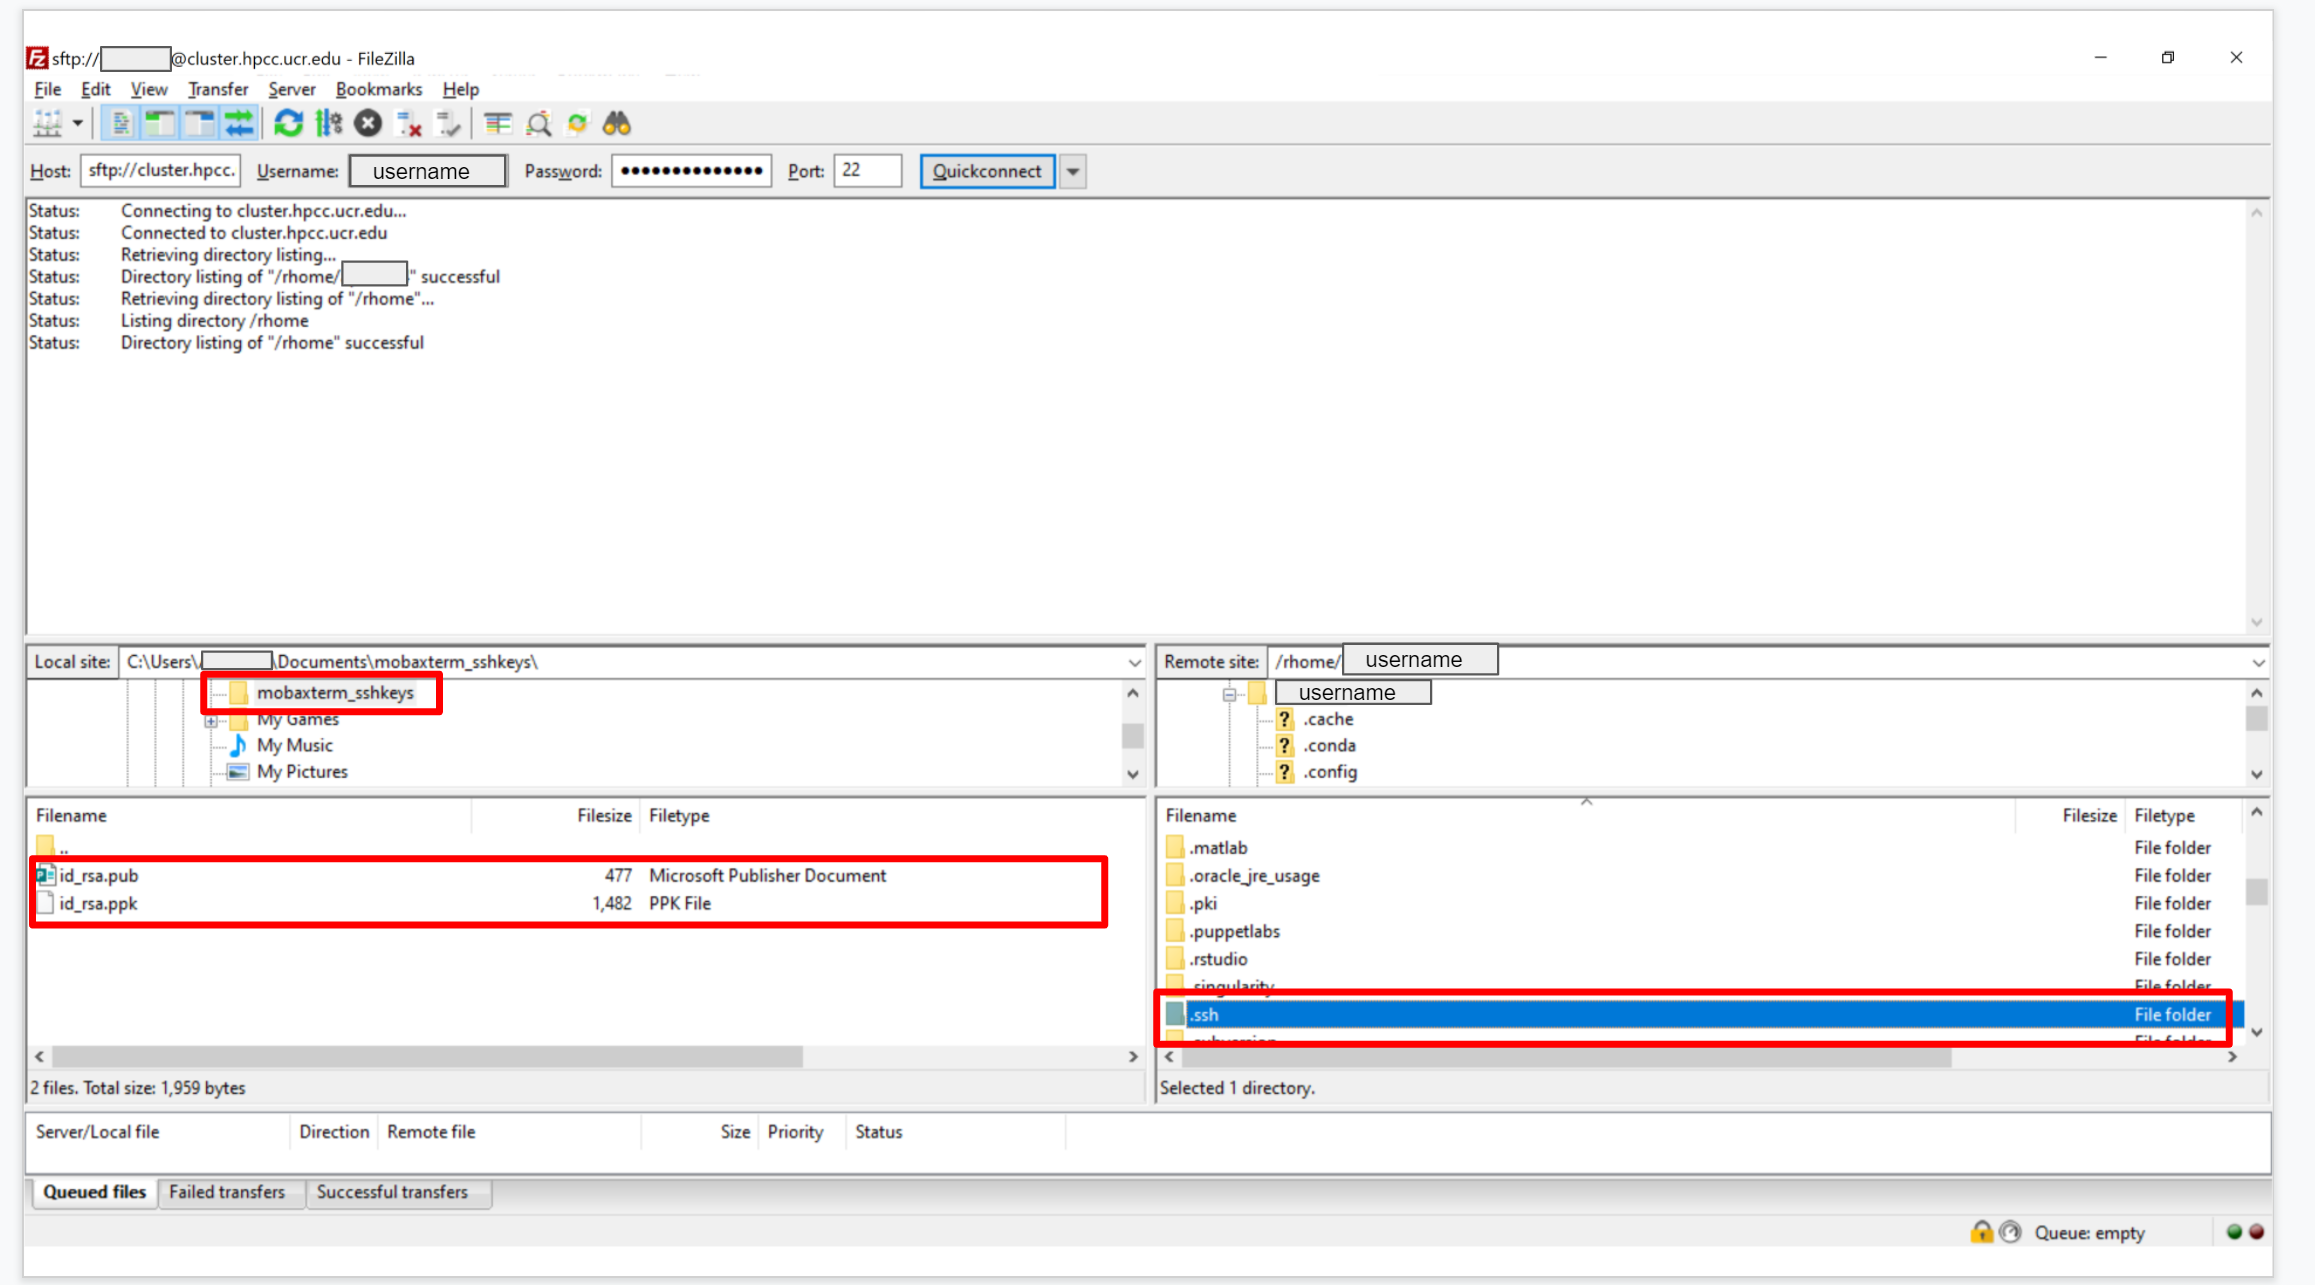
- Once the file is transferred to the cluster, be sure to rename
id_rsa.pubtoauthorized_keys. Alternatively, if anauthorized_keysfile already exists, then you can edit theauthorized_keysfile (Right Click > View/Edit) and place the contents of theid_rsa.pubfile inside of it.
Private SSH Key
Once your public key is in place, now you can configure Filezilla to use your private SSH key and connect to the cluster through the cluster.hpcc.ucr.edu server.
Open Filezilla
Site Managerbutton in the top bar of icons.Click on the HPCC created in the “Public SSH Key” section
Change the settings to the following:
Protocol: should be set toSFTP - SSH File Transfer ProtocolHost: type incluster.hpcc.ucr.eduPort: type22Logon Type: set toKey fileUser: type in your HPCC username
After these fields are finalized, click the
Browse..button.
Navigate to the folder you saved your private key file in and open the private key file
mobaxterm_privkey.ppk. You should see the added keyfile in theKey file:box, then clickConnect.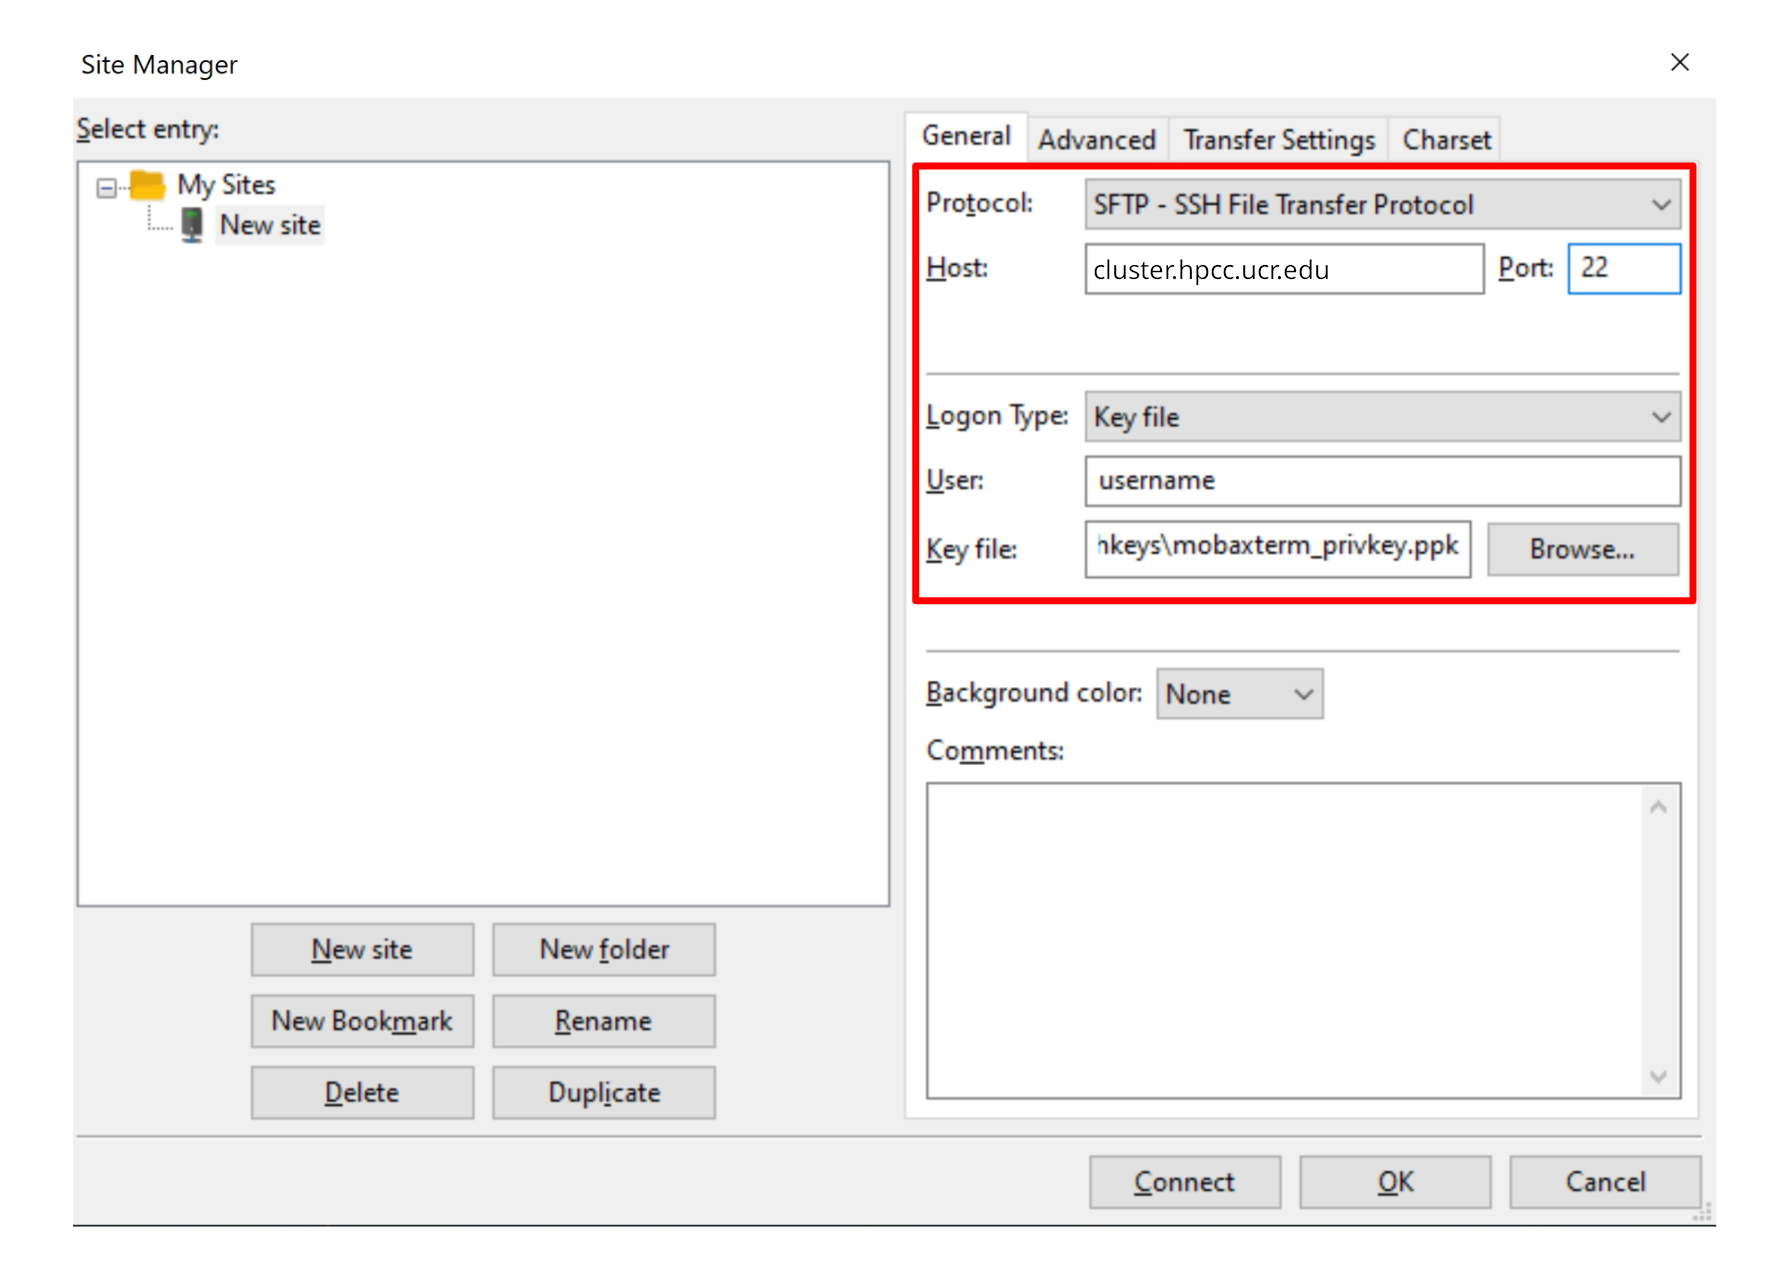
Subsequnt connections can be done from the
Quickconnecthistory by clicking on the down arrow to the right side of theQuickconnectbutton. Remember to select thecluster.hpcc.ucr.eduaddress.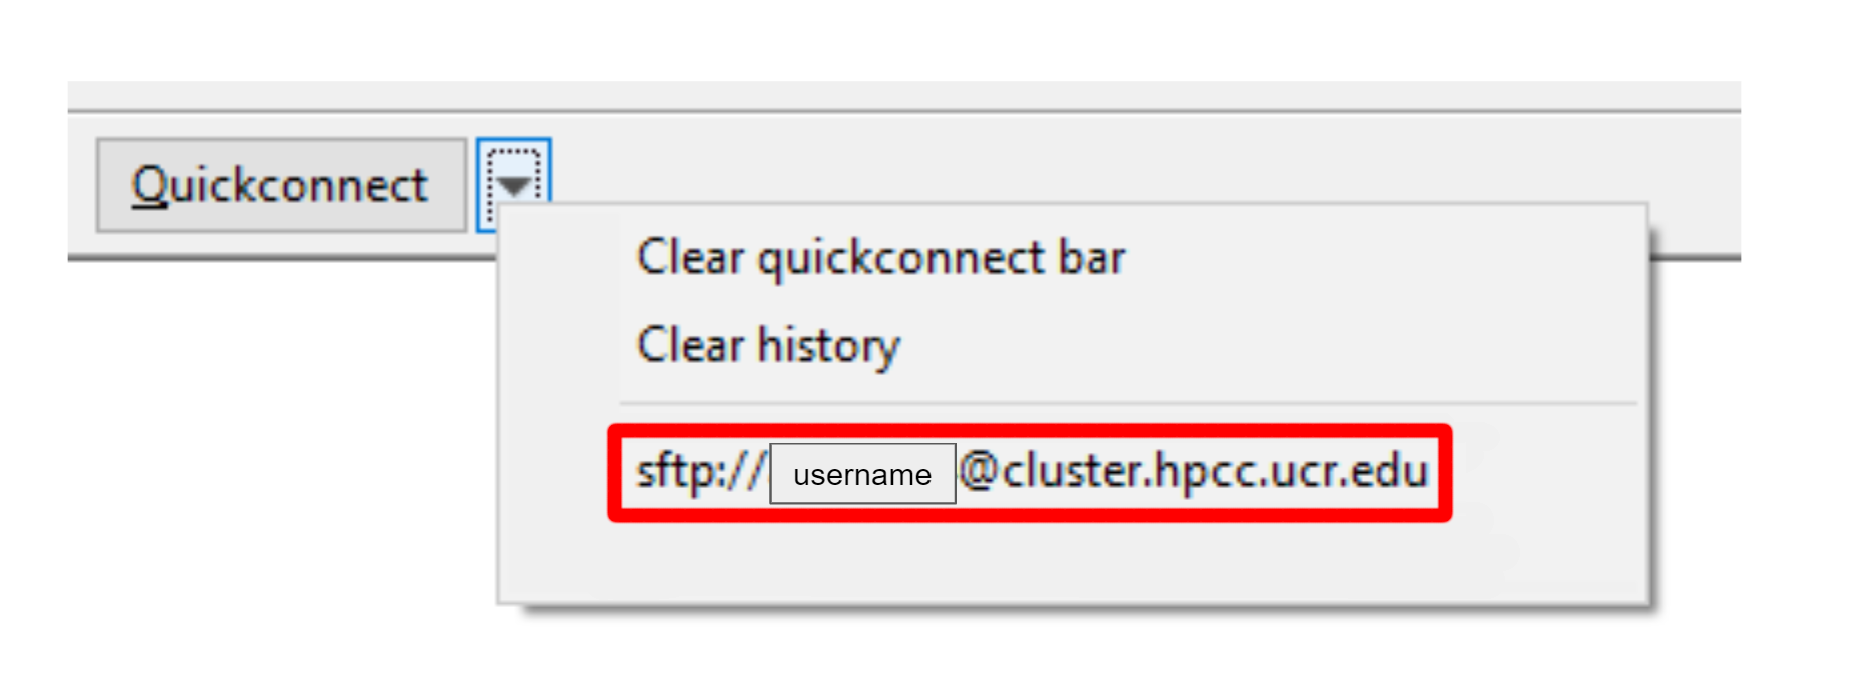
Transfer files by double clicking or drag-n-drop. For more details regarding file transfers vist Filezilla Usage.