Text Editors
7 minute read
Text Viewing
Here are a few commands that are used to just display the text within a file:
more <FILENAME>     # Views text, use space bar to browse, 'q' to quit
less <FILENAME>     # Also views text, uses arrow keys to browse, 'q' to quit
cat  <FILENAME>     # Concatenates files and prints content to screen
Text Editors
- Nano
- A simple terminal-based editor.
- Neovim
- Non-graphical (terminal-based) editor. Neovim is an improved version of vim.
- Vim Gvim
- Non-graphical (
vim) or window-based editor (gvim). Vim is the improved version of vi.
- Non-graphical (
- Emacs
- Non-graphical or window-based editor.
- Visual Studio Code
- Graphical editor that runs on your local machine that supports different plugins.
Nano
The nano editor is the simplest to use and can be good for beginners:
nano <FILENAME> # Open file if it exists, or create it
Navigation in nano uses the arrow keys, and all other commands are noted at the bottom of the screen.
The CTRL key is used in combination with other keys to execute commands in nano.
For example, at the bottom of the nano screen it is noted that ^X is used to exit.
This means you will need to hold the CTRL key and then press x in order to quit.
After that, just follow the on screen prompts at the bottom.
For more nano commands, please visit Overview of nano shortcuts.
Neovim / Vim / GVim / VI
All of these editors follow the same principals.
nvim <FILENAME>     # Open file if it exists, or create it
vim <FILENAME>      # Open file if it exists, or create it
gvim <FILENAME>     # Open file if it exists, or create it (must have XForwarding or VNC)
vi <FILENAME>       # Open file if it exists, or create it
For more information please visit Vim Manual.
Emacs
Navigation in emacs also uses the arrow keys. It is similar to nano, in that, CTRL is combined with other keys to execute commands.
For example, to open a file, simply run the command with a file name:
emacs <FILENAME> # Open file if it exists, or create it
Then, after you have made some changes, exit by holding the CTRL key and then pressing c, releasing and then holding the CTRL key once more and pressing c again.
After that, just follow the on screen prompts at the bottom.
For more commands in emacs please visit GNU Emacs Reference Card
Visual Studio Code
Install
This editor should be installed on your local machine (ie. workstation, laptop). Please visit Visual Studio Code for software download.
Remote Editing
To setup Visual Studio Code to remotely edit files on the cluster, please refer to our guide to VSCode Usage on HPCC.
RStudio Server
The shared web instances of RStudio will soon be deprecated and replaced with Open OnDemand. Please start transitioning there to receive the best performance from RStudio.
Two options exist to access the RStudio Server IDE:
While the Shared Web Instance is easier for less experienced users, it does not allow to load a specific R version nor access more extensive computing resources.
Thus, experienced users may prefer the Compute Node Instance as it does not share these limitations.
1. Shared Web Instance
R users can log in to their HPCC accounts via an RStudio Server instance.
To do so, visit the HPCC RStudio Server.
Next provide your HPCC login credentials and click the Sign In button.
2. Compute Node Instance
a. Interactive
Alternatively, an RStudio Server instances can be started directly on a compute node and accessed via an SSH tunnel. This involves the following steps.
SSH into the cluster as outlined here.
Log in to a compute node interactively via
srun, where the proper parameters need to be specified by the user. These include partition name, RAM, number of CPU cores, wall time limit, etc. Additional details on usingsrunare available here.
srun --partition=short --mem=8gb --cpus-per-task=2 --ntasks=1 --time=2:00:00 --pty bash -l
- Load the latest versions of
RandRStudio Serverusing the module system:
module unload R
module load R/4.3.0 # Or latest version (previously it was R/4.2.2)
module load rstudio-server/2023.09.1-494 # Or latest version (previously it was rstudio-server/2022.02.0-443)
- Start RStudio Server:
start-rserver.sh
- Next follow the instructions printed to the terminal after running
start-rserver.sh. The command-lines given in these instructions need be executed in a terminal of a user’s local system, and not on the remote system wherestart-rserver.shwas exectuted.
b. Non-Interactive
The steps for launching an interactive job can be integrated into a script and submitted non-interactvely for a quicker deployment of a RStudio Server instance on a compute node.
Instructions outling how to do this are located here.
Jupyter Server
The shared web instance of Jupyter will soon be deprecated and replaced with Open OnDemand. Please start transitioning there to receive the best performance from Jupyter.
Two options exist to access JupyterLab:
1. Jupyter Web Instance
Users can log into their HPCC accounts via the JupyterHub server instance. To do so, visit the HPCC JupyterHub server. Next provide your HPCC login credentials and click the Sign In button.
Account changes can sometimes lead to users needing to restart active cluster sessions, and Jupyter is no different. To restart your Jupyter session, from the “File” tab click “Hub Control Panel”. From the new screen click “Stop My Server”, then “Start My Server”. After a few seconds your session will be restarted.
Choosing A Profile
There are a handful of profiles that can be selected from, below is a chart displaying the existing profiles.
| Profile Name | Partition | Resources | Time Limit | Notes |
|---|---|---|---|---|
| Immediate Server | - | Shared | None | This will run Jupyter on a shared machine with all other users who choose this option. Choose this if you want a server with no time limit at the expense of worse performance. |
| Quick Server | Short | 2 cores, 8GB memory | 2 Hours | This is for a quick session lasting under 2 hours. Good for testing or debugging work quickly. |
| Compute Intel | Intel | 8 cores, 32GB memory | 24 hours | This will run on an Intel machine with a 24 hour time limit. |
| Compute Batch | Batch | 8 cores, 32GB memory | 24 hours | This will run on an Batch (AMD) machine with a 24 hour time limit. |
| Compute Epyc | Epyc | 8 cores, 32GB memory | 24 hours | This will run on an AMD machine with a 24 hour time limit. |
| Highmem | Highmem | 8 cores, 128GB memory | 24 hours | This will run on the highmem partition, good for jobs that require a lot of memory. |
NOTE that when your job reaches the specified time limit the job will be terminated and jupyter session closed. Jupyter autosaves every 2 minutes, but any new work will be lost and any running jobs cancelled once the time limit is reached.
If your job requires more flexible resources, please refer to the below section for running Jupyter directly on a compute node.
2. Jupyter Compute Node Instance
a. Steps
First, start an interactive session on a compute node
srun -p epyc -t 4:00:00 -c 4 --mem=10GB --pty bash -l # Customize as needed
After your job has been scheduled, activate the jupyterlab module and start the server.
module load jupyterlab/
start-jupyter.sh
A fed seconds after running start-jupyter.sh it will prompt you for a password. Enter a password that you would like to use to access the notebook.
NOTE: Text will not show up when you type your password, this is expected.

After entering a password, it will print some text guiding you on creating a tunnel.
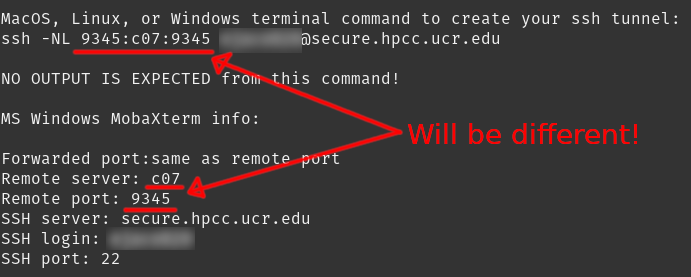
NOTE: The port and node will likely be different than pictured. This is expected, and unique to each session.
As the text suggests, enter the ssh -NL command in your terminal or setup MobaXTerm with the supplied details. If using the ssh method, the terminal is expected to hang after logging in and no further output should be generated.
After a few seconds the server will start. At this point you can navigate to “http://127.0.0.1:PORT/lab” on your local machine, **replacing PORT with the port assigned when running the start-jupyter.sh command (9345 in the example above).
b. Logging In
After navigating to the login page, you will be prompted for the password you originally gave the notebook.
After logging in, you can use the notebook as you would on our hosted JupyterLab server.
c. Shutting Down
When you are finished with your session, you can stop the Jupyter server from running by going to “File > Shut Down” in the notebook, or by entering Ctrl+C in the terminal window.